There are few tech problems more frustrating than a PC not booting.
You press the power button, expecting the familiar whir of fans and the glow of your monitor, but instead, you get… nothing.
Or maybe you get lights and sounds, but a blank screen.
That feeling of helplessness is something every computer user dreads.
It’s not just an inconvenience; it’s a barrier to your work, your games, and your connection to the digital world.
We will walk you through a logical, step-by-step process to diagnose the exact cause of the failure.
By systematically checking for power issues, hardware faults, and software corruption, you can isolate the problem and apply the correct fix to get your PC running again.
Start With The Basics: The First 5 Minutes
Before diving into complex diagnostics, let’s cover the simple but often overlooked first steps.
Don’t panic and start taking your PC apart just yet.
Sometimes, the simplest solution is the right one.
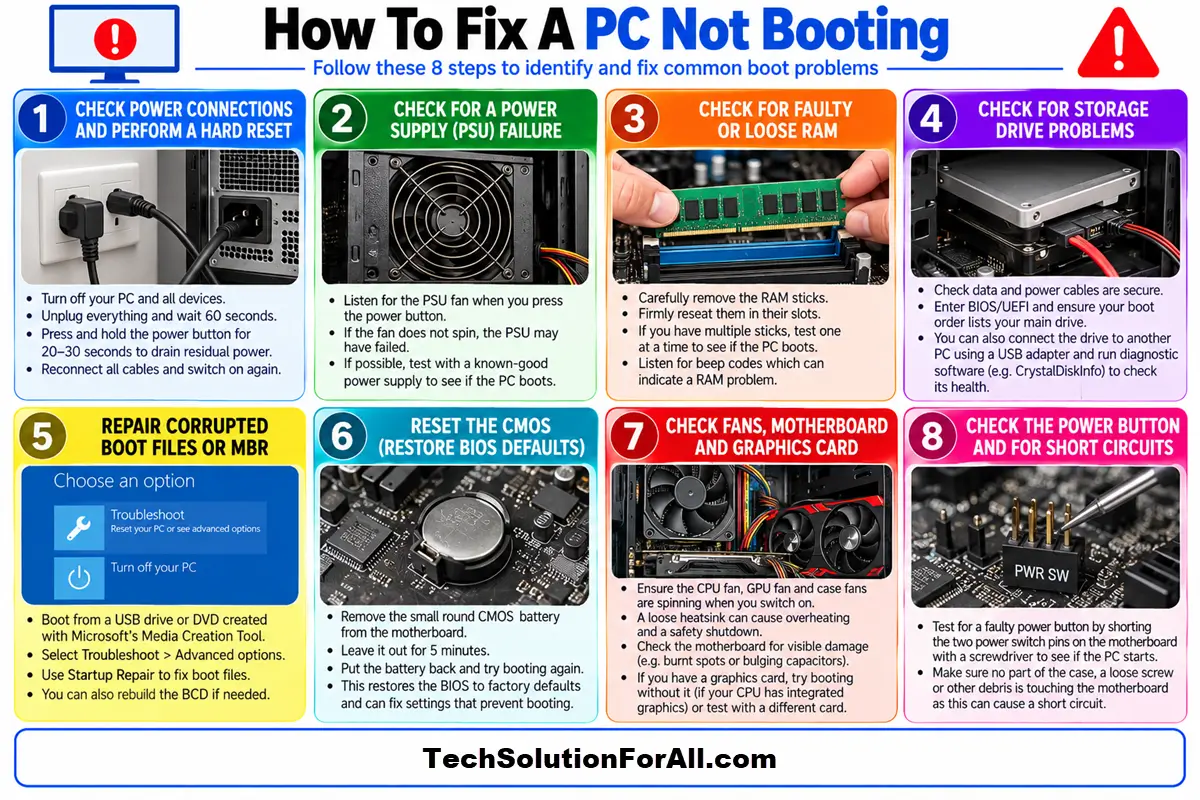
1. Check All Power Connections
This might sound obvious, but you’d be surprised how often a loose cable is the culprit.
A pc not booting can be as simple as a power cord that’s been accidentally kicked or a wall socket that’s been switched off.
- Power Cord:
Ensure the power cable is firmly plugged into both the back of your PC’s power supply unit (PSU) and the wall outlet or surge protector. - PSU Switch:
Most desktop power supplies have a small switch on the back, usually labelled ‘I’ for on and ‘O’ for off.
Make sure this is in the ‘I’ position. - Wall Outlet:
Plug a different device, like a lamp, into the same outlet to confirm it’s working.
2. Perform a Hard Reset
A hard reset, also known as a power cycle, can clear out temporary hardware or firmware glitches.
As recommended by support specialists at HP, this process drains all residual power from the components, allowing them to start fresh.
- Power Down:
Turn off your computer. - Unplug Everything:
Disconnect the main power cord from the back of the PC.
Then, unplug all non-essential peripherals – USB hubs, external hard drives, printers, and webcams.
Leave only your monitor, keyboard, and mouse connected. - Drain Power:
With the main power cord unplugged, press and hold the power button on your PC for about 20-30 seconds. - Reconnect and Test:
Plug the power cord back in and try to turn on your computer.
If your PC boots up, one of the peripherals you disconnected was likely causing a conflict.
You can reconnect them one by one, restarting each time, to identify the problematic device.
Common Causes For A PC Not Booting
If the basic checks didn’t solve the problem, it’s time to investigate the most common hardware and software issues.
We’ll move from the most likely culprits to the less common ones.
Power Supply Unit (PSU) Failure
The PSU is the heart of your PC, supplying power to every component.
When it fails, nothing works.
A failing PSU is a very common reason for a pc not booting.
Symptoms can range from the PC being completely dead to it turning on for a second and then immediately shutting off.
Why it Happens:
PSUs can fail due to age, power surges, overheating from dust buildup, or simply being insufficient for the hardware they’re powering.
As experts at AMD point out, an insufficient or faulty PSU can lead to boot failures and random crashes.
How to Diagnose and Fix:
- The Fan Test:
Does the fan on the PSU spin when you press the power button?
If not, the PSU is likely dead. - The Paperclip Test (Advanced):
This involves tricking the PSU into turning on without being connected to the motherboard.
It’s a definitive way to test the PSU itself, but it requires care.
You can find many video guides online demonstrating this technique safely. - Swap It Out:
The most reliable method is to test your system with a known-good power supply.
If the PC boots with a different PSU, you’ve found your problem.
Faulty RAM (Random Access Memory)
RAM is your computer’s short-term memory.
If a RAM stick is faulty or has become unseated from its slot, your PC may fail its Power-On Self-Test (POST) and refuse to boot.
Often, you’ll see lights on the motherboard and fans spinning, but nothing on the screen.
Why it Happens:
RAM can fail over time, or it can be dislodged by a physical knock to the PC case.
Static electricity during installation can also damage the modules.
How to Diagnose and Fix:
- Reseat the RAM:
Turn off and unplug your PC.
Open the case and locate the RAM sticks on the motherboard.
Unclip them, carefully remove them, and then firmly reseat them back into their slots until the clips on both sides click into place. - Test One Stick at a Time:
If you have multiple RAM sticks, test them individually.
Remove all but one stick and try to boot.
If it works, that stick is good.
Repeat this process for each stick in the same slot to identify the faulty one. - Check for Beep Codes:
Some motherboards use a series of beeps to signal specific hardware errors.
Consult your motherboard’s manual to interpret these codes; they can often point directly to a RAM issue.
Storage Drive Problems (SSD/HDD)
Your operating system (like Windows) is stored on your main storage drive.
If the motherboard can’t detect this drive or if the drive itself has failed, the boot process will halt at this stage, leading to your PC Not Booting.
You might see an error message like “Boot Device Not Found” or “Operating System Not Found.”
Why it Happens:
Cables can come loose, the drive’s boot sector can become corrupted, or the drive can fail mechanically (for HDDs) or electronically (for SSDs).
How to Diagnose and Fix:
- Check Connections:
Open your PC and ensure the SATA data and power cables are securely connected to both the storage drive and the motherboard. - Check the BIOS/UEFI:
When you first turn on your PC, press the designated key (often Del, F2, or F12) to enter the BIOS/UEFI setup.
Look for a “Boot Order” or “Boot Priority” menu.
Is your main storage drive listed?
If not, the motherboard isn’t seeing it, which points to a connection or drive failure. - Use a Diagnostic Tool:
If you can access another computer, you can connect the problematic drive (using a USB adapter) and run diagnostic software like CrystalDiskInfo to check its health.
Corrupted Boot Files or MBR
Sometimes the hardware is fine, but the critical software needed to start Windows is damaged.
The Master Boot Record (MBR) or Boot Configuration Data (BCD) can become corrupted, preventing the system from loading.
Why it Happens:
This can be caused by improper shutdowns, malware, or errors during a Windows update.
How to Diagnose and Fix:
This requires a Windows Installation Media (a bootable USB drive or DVD).
You can create one on another PC using Microsoft’s Media Creation Tool.
- Boot from Installation Media:
Insert the USB/DVD and configure your BIOS to boot from it. - Access Repair Options:
On the initial Windows Setup screen, choose “Repair your computer” instead of “Install now.” - Use Automatic Repair:
Navigate to Troubleshoot > Advanced options > Startup Repair.
This automated tool can fix many common boot problems. - Rebuild the BCD:
If Startup Repair fails, go back to Advanced options and open the Command Prompt.
Here, you can use powerful commands to fix the boot records.
The official Microsoft Learn documentation provides a detailed guide on using commands like BOOTREC /FIXMBR, BOOTREC /FIXBOOT, and BOOTREC /REBUILDBCD to manually repair the boot environment.
Advanced Troubleshooting For A PC Not Booting
If you’ve worked through the common causes without success, it’s time to look at the core components.
These steps are more involved but are necessary when a pc not booting is caused by a deeper hardware issue.
Reset the CMOS
The CMOS (Complementary Metal-Oxide-Semiconductor) is a small chip on your motherboard that stores your BIOS/UEFI settings.
A small, silver, watch-like battery powers it.
If these settings become corrupted, it can prevent your PC from booting.
Resetting the CMOS restores the BIOS to its factory defaults.
How to Do It:
- Power Down and Unplug:
Completely disconnect your PC from power. - Locate the Battery:
Find the small, round battery on your motherboard. - Remove and Wait:
Carefully pop the battery out.
Wait for about 5 minutes to ensure all settings are cleared. - Reinsert and Test:
Put the battery back in, plug in your PC, and try to boot.
Checking the Motherboard
A motherboard failure is one of the more serious reasons for a pc not booting.
It’s the central hub connecting all components, and if it fails, the whole system goes down.
Look for visible signs of damage, such as burnt spots or bulging capacitors.
Many modern motherboards also have small LED indicators that can display an error code to help you diagnose the problem.
Check your motherboard manual for the meaning of these codes.
Dealing with Overheating
If your PC turns on but then shuts down after a few minutes, it could be an overheating issue.
The CPU or GPU may be getting too hot, triggering a safety shutdown.
While this is less common during the initial boot-up, it can happen if the CPU cooler has failed or is not seated correctly.
How to Check:
- Check Fans:
When you power on the PC, visually confirm that the CPU fan and any case fans are spinning. - Check the Heatsink:
If you’re comfortable doing so, open the case and check if the CPU heatsink is firmly attached to the motherboard.
A loose heatsink is a common cause of overheating.
Less Common Causes Of A PC Not Booting And Edge Cases
- Faulty Power Button:
The physical power button on your case can fail.
You can test this by shorting the two power switch pins on the motherboard with a screwdriver to see if the PC starts. - Short Circuit:
A short circuit can occur if a loose screw or part of the case is touching the motherboard.
A full teardown and rebuild outside the case (on a cardboard box) can help diagnose this. - Graphics Card Issues:
A faulty graphics card can sometimes prevent a PC from booting, even if the rest of the components are fine.
Try booting without the graphics card (if your CPU has integrated graphics) or with a different card.
Prevention: How To Avoid Future PC Not Booting Problems
- Use a Surge Protector:
Protect your components from power surges that can cause damage. - Keep it Clean:
Dust is the enemy of electronics.
Regularly clean the inside of your PC with compressed air to prevent overheating. - Ensure Good Airflow:
Make sure your PC has adequate ventilation and that fans are not blocked. - Perform Safe Shutdowns:
Always shut down your operating system properly instead of just holding the power button.
Final Thoughts On A PC Not Booting
Facing a pc not booting can be intimidating, but it’s a problem that can almost always be solved with a methodical approach.
By starting with the simplest checks and progressively moving to more complex diagnostics, you can systematically eliminate potential causes.
Remember to be patient, work carefully, and consult your motherboard manual when in doubt.
Each step, whether it’s reseating RAM or rebuilding the boot record, teaches you more about how your computer works, turning a moment of panic into a valuable learning experience.
Frequently Asked Questions About A PC Not Booting
Why is my PC turning on but no display?
This common issue often points to a problem with your RAM or graphics card.
The PC is getting power, but it’s failing the initial hardware check (POST).
Try reseating your RAM sticks and your graphics card first.
If that doesn’t work, test each RAM stick individually to find a potential faulty module.
Can a bad power supply cause a pc not to boot?
Absolutely.
A faulty or failing power supply unit (PSU) is one of the most common causes of a PC not booting.
It can manifest as a completely dead computer, or the PC might power on for a split second and then shut down.
Testing with a known-good PSU is the best way to diagnose this.
How do I fix a “Boot Device Not Found” error?
This error means your PC’s BIOS/UEFI cannot find the operating system.
This could be because the storage drive (SSD/HDD) has failed, its data or power cable is loose, or the boot order in the BIOS is incorrect.
First, check the physical cable connections.
Then, enter your BIOS and ensure your primary storage drive is set as the first boot device.
How To Perform A Hard Reset To Fix Boot Issues
This simple procedure can resolve many unexplained boot problems by clearing residual electrical charge from your components.
Total Time: 5 Minutes
Supply: None required
Tools: None required
Steps:
- Power Down and Disconnect Peripherals:
Turn off the computer completely.
Unplug all non-essential devices (printers, external drives, USB hubs), leaving only the monitor, keyboard, and mouse. - Disconnect Main Power:
Unplug the main AC power cord from the back of your PC’s power supply. - Drain Residual Power:
With the power cord disconnected, press and hold the computer’s power button for 20-30 seconds.
This drains any lingering charge from the motherboard. - Reconnect and Test:
Plug the AC power cord back in.
Turn the computer on to see if the problem is fixed.
If it boots, reconnect your other devices one by one to find any that might be causing a conflict.
Finally be sure to check out our Tech Troubleshooting FAQ or our Printer Troubleshooting Tips pages for even more general tips that cover a wide range of technical problems and solutions.
(If after reading the above article you still have a “PC Not Booting” problem, then you might find a much less obvious solution on the above tech pages!)